Thursday, April 3, 2014

In Your Face Fabric Lady! (Part III - Burlap Monogrammed Frame)

Well, well, well. I see you're back for more. I knew you would want to see my victory lap as this is the last installment of the "In Your Face Fabric Lady" **series. Don't worry, I'll have more creative blog posts in the future, but this is the last project I made with the stuff that I bought from that particular Jo-Ann Fabric shopping trip and burlap was one of the fabrics that the Fabric Lady cut for me.

This project all started with our friends Paul and Brooke Berg. For a wedding shower gift, they bought us a black frame that held twelve 4x6 photos and I put our wedding pictures in that frame. When we moved from Minneapolis to Cincinnati, I had unpacked all our frames and had them resting against our hutch. One morning before church, I accidentally knocked the Berg frame over and the glass broke. I immediately started crying because even though it could be replaced, when I looked at that frame, I always thought of Brooke and Paul and I was really missing our good friends. Anyway, Troy gave me a big hug, we swept up the glass and replaced the frame, but I kept the original frame without the glass because I just knew I could do something crafty with it.

I saw on Pinterest that someone had wrapped the inside of a picture frame in burlap and then put their initial in the middle of the frame. I thought that was so cute and I love monogrammed stuff, so I thought I would make my own with the Berg frame. First I removed the dividers for all the pictures. (Don't worry, I saved it in case it comes in handy for a future craft project!) Then I opened up the back of the frame and took out the cardboard insert. I took my burlap and wrapped it around the cardboard and then stapled the burlap into place along the edges of the cardboard. This was a little bit tedious. I had to remove staples and then re-staple in some places after pulling the fabric to make sure it would be tight.
The back doesn't have to look pretty. It gets covered up, but you get the idea.


I put the backing back on but when I flipped the frame over, I realized that even though I stapled the burlap as close to the edge of the cardboard as possible, you could still see some of the staples and that drove me crazy. You should have seen me assess this problem. I literally put the frame on my desk and walked past it a bunch of times to see if it was noticeable. It was. I had left over cord rope from my nautical flags project, so I decided to hot glue the rope along the edges and then tie a knot in the middle where the ends meet. I loved how it turned out! Good thing those staples were being stubborn! Otherwise, I wouldn't have even tried the rope! See, sometimes mistakes can be awesome and lead to cool realizations. (Cue the Full House, "we have fixed all of life's problems" music)

I love me some nautical rope!
I bought a large wooden letter 'C' (for Carlson, obviously) and then a small wooden plaque. Unfortunately, I didn't take pictures of these next steps so you're going to have visualize with me. First I painted both the 'C' and the plaque black. Then on the plaque, I used scrapbook stickers and put "est. 2007" (that was the year the hubs and I got married.) I wanted the wooden signs to look a little distressed, so then I painted both of them white. That's right, I painted right over the stickers. I was a little nervous how the plaque would look when I pulled the stickers off because they looked like they weren't going anywhere after being painted. However, the stickers were easy to take off using a pair of tweezers. Then I lightly sanded both the letter 'C' and the plaque. You only need to sand in areas where you want the background color to show through. After I distressed the plaque, I realized that the lettering didn't pop as much as I would like. So I got a very thin paintbrush and painted the letters black so they would pop.

All distressed and ready to go.

After the wooden pieces were dry, I placed them on my burlap frame, but I felt like there was too much negative space. The project needed something else. I decided to paint our last name on the burlap and then have the wooden pieces glued above and below the name. However, I already hot glued the rope to the frame, so I really couldn't mess up. I decided I should do a practice run to see how the letters would turn out. I cut a small piece of burlap and sponged my paint over the stencil. When I pulled the stencil off, I thought it looked great and was ready to proceed to the real deal.

This picture is brought to you by the letter 'A'
I grabbed my trusty blue painter's tape and put a long piece of tape going horizontally along my frame where I wanted my letters to be. This was going to be my guide. I always lined up the top part of my stencils with this piece of tape. I measured the frame and found the middle, so I started with the letter that was in the middle of our name, 'L.' I thought it would be easier to work out both sides to ensure the name would be center.
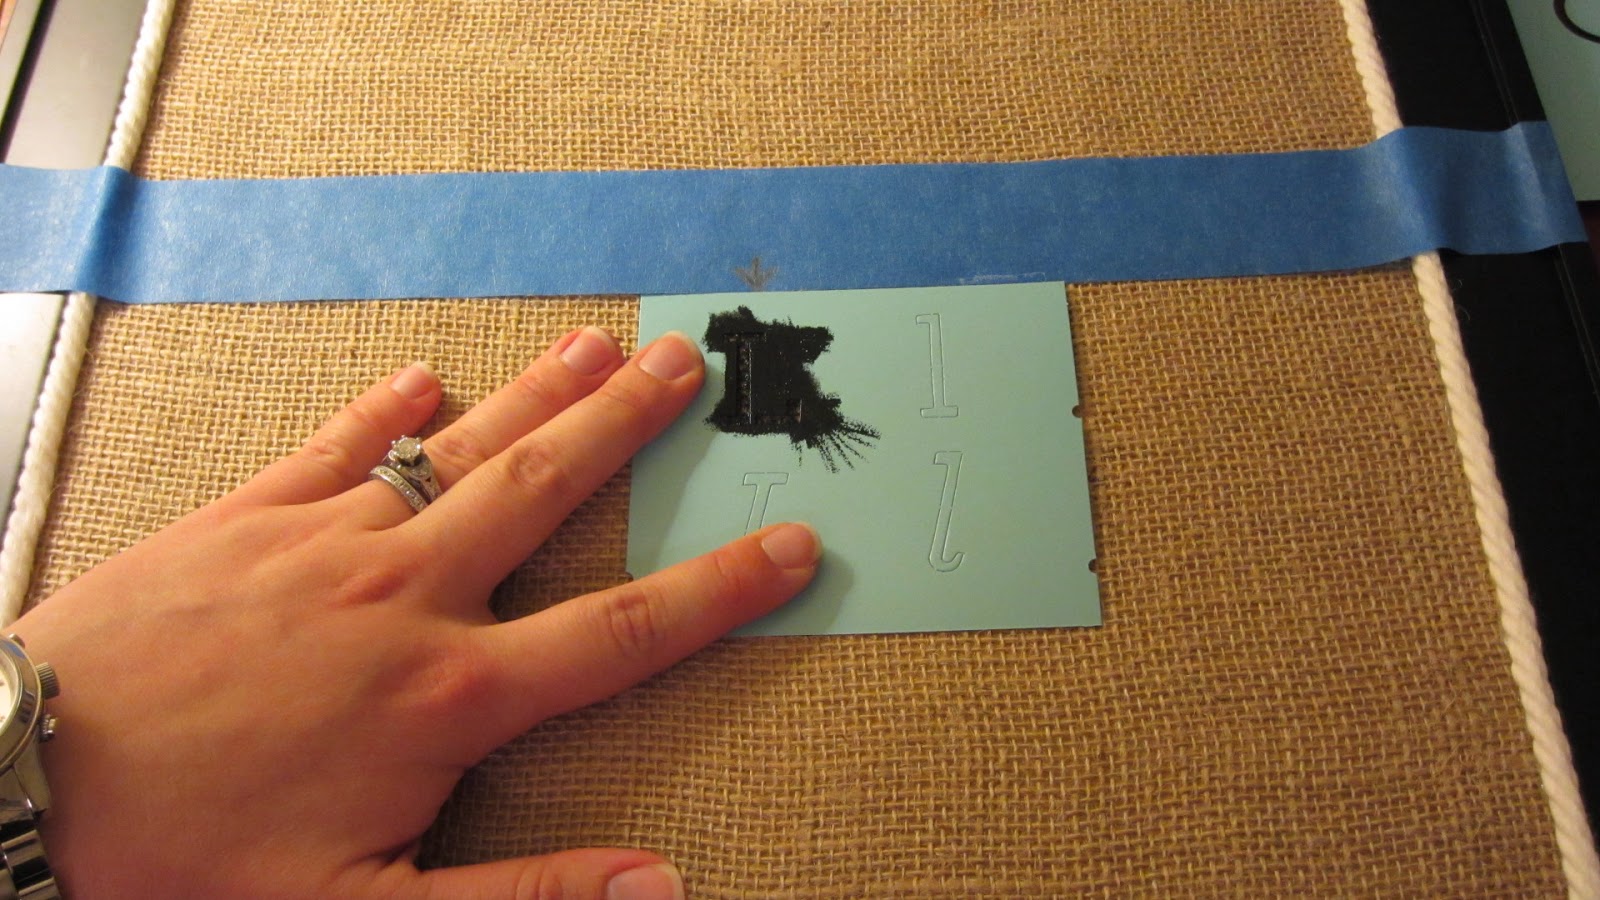
Maybe I have a future as a hand model?

I took a sponge brush and sponged black acrylic paint over the stencil and then slowly peeled the stencil off the burlap. I let the letter mostly dry before I painted the next letter; it doesn't really take too long because you aren't saturating the burlap with the paint. For the rest of the letters, I wanted to make sure there would be good spacing. I would put the stencil under the painted letters to see how closely I wanted the letters to be. Then I would put a little tick mark on the top of the stencil and then carefully follow an imaginary line up to the blue painter's tape and put another tick mark on the tape. Then I would bring the stencil up to the tape and match the tick marks. Be sure that you pick the stencil up and not drag it up because you don't want to smear any paint that may not have dried on a previous letter.

Matching the tick marks to make sure there is even spacing between letters.
After I finished all my letters, I took a minute to exhale because this whole time I was sort of holding my breath. I was nervous that the lettering wouldn't look good and I had already stapled the burlap and hot glued the rope to the frame, so I had little wiggle room for mistakes, like none. I liked the outcome! I plugged in my trusty hot glue gun and glued the wooden 'C' and the plaque to the burlap.


I loved it! I thought my final product turned out even better than what I had seen on Pinterest! I hung that bad boy up in our foyer and then took a picture and sent it to my sister, Laura who agrees that this craft was the bomb-diggity.The Berg frame has been reborn! Hurray!


Wow, I feel like so much has happened since the Fabric Lady openly challenged me to a craft off. (I may have made that up in my mind.) So many crafts; so much sewing, so much paint, so much fun. With that, friends, I would say it's time to put up the final score and run a few victory laps.


Pam 4, Fabric Lady 0 . . . . . Boom-Sha-ka-la-ka!


** For previous posts from this series, see the following:
Fabric, Glue and Macaroni
In Your Face Fabric Lady (Part I - Pennant Bunting)
In Your Face Fabric Lady (Part II -Nautical Flags)
More Nautical Nursery Decor

Monday, March 31, 2014

Dishwasher Doom

I am just going to take a little break from the crafting posts so that the Fabric Lady can take a breather and reassess her strategy. Who am I kidding? I am creaming her! I love winning. I thought that I would talk a little bit about a chore which I loath and I wonder if anyone out there feels the same way I do. But first, let me share a story that has nothing to do with the title of this blog and makes you wonder when I am going to get to the topic at hand and how this story relates to said topic.

Our Sweet Dog, Bruce.
Our dog, Bruce, is not a big fan of getting a bath. He knows what's up when we start talking to him sweetly in a voice that is an octave above our regular speaking tone. He hears the water running in the bathtub and somehow knows that it is not for one of his humans to take a soak. We have to bribe him into the bathroom and then close the door. The whole time he is getting bathed, his tail is between his legs and he stares up at us with his sad, puppy dog eyes, pleading with this inhumanity to be done. After he gets toweled off and we let him escape from his prison (A.K.A. the bathroom), he runs around the house like wild beast. Let me tell you, Bruce is a fast dog. You might think that by looking at him, he would be a runt, but he can keep up and pass the big dogs. When he gets done with a bath, he runs even faster than when he is at a dog park. I think I need to become friends is a cop so I can borrow his/her radar gun. I would love to know what speed Bruce is clocking. I heard that dogs run like crazy after a bath because they have so much anxiety pent up from the actual bath that they need to release. I also think they are just really happy that the chore is over.

I can relate to Bruce when it comes to emptying the dishwasher. I hate it. I don't know why. I am a very diligent person. My house is always clean and things are always put away. There is just something about having to unload a dishwasher that makes me want to run away. I usually avoid it as long as possible. I will even hand wash the dishes I use so that dirty dishes don't pile up in the sink instead of emptying the dishwasher. I carefully avoid that part of the kitchen, eying the appliance closely they way Bruce does the bath. I think of every excuse not to put the dishes away. Eventually, I muster the will to put them away - that will would be the knowledge that Troy is on his way home and since he was the one who loaded and started the dishwasher, I should probably put them away before he gets home. But even this afternoon as I begrudgingly put the clean dishes away, I almost avoided the task again by thinking about how I should blog about how much I hate to put the dishes away. You will be happy to know that I did complete my task and felt like I should have gotten a sticker. (See my thoughts on Adult Sticker charts here.)
Z's reaction when he has to empty the dishwasher.

The best feeling is when that last dish has been put away and I know that the dishwasher is empty. I will have a good length of time (though not nearly long enough) before I have to do that chore again. I am so excited, that I run around the house with top notch speeds, much like my K-9 companion, Bruce, which can be somewhat embarrassing should we be hosting company.

This would be a great opportunity to talk about how awesome my husband, Troy Ronald Carlson is. He knows how much I hate to empty the dishwasher and often will do it for me even though he doesn't like to do it either. There are always a few dishes which have their home in the kitchen that Troy is unaware of, so he will leave them out on the counter for me to put away. Honestly, it is a sight for sore eyes because when I see that, I know I only have to put away two or three items and the rest is already done thanks to my sweet and fantastic hubs. The other night I actually gave him a high five. It was a really good high five too; full contact, great "smack" sound, little palm pain.

So, in conclusion; my name is Pam and I suffer from Dishwasher Doom. Anyone else need to go to a support group with me on this issue?

Thursday, March 27, 2014

More Nautical Nursery Decor

After I wrote about the nautical flags I made for Zachary's room, I thought I would do a quick little blip about the other nautical crafts I made for my sweet sailor's nursery. Unfortunately, I don't have step by step pictures, but the crafts really weren't that challenging, and you would be able to easily make them yourself.

When we first moved to our new house, Zachary's room already had window valences that were navy blue which was perfect! I wanted to spice them up a little bit and make them look more nautical. Since I didn't buy the curtains, I figured I could mess around with them without feeling bad if they turned out to be heinous. As I mentioned before, my mom and sisters threw me a baby shower which was also nautical themed, so I had a lot of rope and ribbon that they used as decoration. I decided to use a thick piece of cord rope and cut it in two equal pieces - one for each curtain. Then I knotted and unraveled the ends. My sister made two cute clusters of ribbon that I put in the middle of the rope and then I pinned the rope to curtain. I sewed across the rope and the curtain and TA-DA! I was done.

Alright, here is where I am going to be brutally honest. I actually broke my sewing machine needle while sewing the first curtain. I guess the rope was too much for the old girl to handle, so for the second curtain, I hand stitched the rope to the curtain and honestly, you can't tell the different and it really didn't take that long.

The curtain rods had dump trucks on the end which I took off. Then I knotted more cord and tied it around the ends of the curtain rods and let the rope hang down. I stepped back to look at my work and was really pleased! I thought the curtains looked great and was a nice way to give the room a nautical feel without having to slap a sailboat in your face.

The finished curtain.

After I hung the curtains, the wall opposite to Z's crib looked bare and needed something. I was looking on Etsy for nautical prints that I could frame. Once again, the cost inhibited me from pulling the trigger. I could find prints that were reasonable but then they didn't come with a frame so that would end up being more than I wanted to spend. I decided to make my own art. I went to Michaels and bought two canvas prints (on sale!) and some acrylic paint. I measured my canvas and then divided the area by how many stripes I wanted. Using my trusty painter's tape, I taped off my canvas and then painted the open space blue. I used a paint brush because I wanted to be able to see the brush strokes, but if you don't like that, then you could probably use a sponge and paint a few coats to ensure full coverage. When the paint was dry, I pulled off the tape and then used a clear sealant on the whole canvas. I found a wooden 'Z' and a wooden anchor that I decided to put in the middle of each canvas. I painted them both with red acrylic paint and then after they dried, I sanded them to distress them a little. Then I also sealed them. To finish up the project, I hot glued the 'Z' and the anchor to each canvas and voilá! I was done. I hung them up and they look quite spiffy.

Take that, expensive Etsy sales lady!

I know that I made these before the Fabric Lady challenged me to a craft off, but since these projects were inspired and executed, I am going to look at this as a win for me. As a favor to her, I will only count both of these projects as one. Let's take a look at the score thus far:


Pam 3, Fabric Lady 0 . . . . . Sha-zam!

Tuesday, March 25, 2014

In Your Face Fabric Lady! (Part II - Nautical Flags)

Well, if that Fabric Lady isn't scared after my last post about the cute Pennant Bunting, she will be after this one. (If you are confused as to why I seem to have a personal vendetta against a woman I am calling "Fabric Lady," read my post Fabric, Glue and Macaroni and it will all become clear.) I guess I am on a little big of a flag kick as my next project was the real reason why I wanted to go to Jo-Ann Fabrics in the first place.

As I have mentioned before, Zachary's room has a nautical theme. I really wanted some kind of decoration to hang above his crib. I thought about putting a couple of wooden oars on the wall, but I couldn't really find any that I liked which were also in my price range, which was cheap. I didn't want to spend a lot of money on a room that would likely be covered in band/car posters and pop stains in ten years. (Let's be honest, my sweet little boy is going to turn into something gross, as all boys do, and there is nothing I can do to stop it.) Then I found a woman on Etsy who would make a flag using martime signal flags to spell out anything you would like. I thought it was such a cute idea! I messaged her and since Zachary's name is a little on the long side, and she was located in the United Kingdom, this project was going to cost me over $100. Ummm......thanks but no thanks.

I knew I couldn't spend that much on decor, but I couldn't get those gosh darn signal flags out of my mind! I loved how each pattern represented a letter or number. I decided I would try to make one myself. I Googled the maritime signal flags and they seemed easy enough; they were mostly stripes and straight lines. So, I bought some white canvas (which the Fabric Lady cut for me while she openly challenged me to a craft-off, though I can't be certain that was her true intention) and made another template out of a cereal box to the size I wanted my flags to be. Then I cut out the flags using my fabulous rotary cutter. I used a thick piece of blue painter's tape at the top of the flag because I was going to fold that part over and sew down when I finished with the painting so that I could string all the flags through rope.

Oh, how I love that rotary cutter.
Next I sewed all around the edges using a straight stitch to keep the canvas from unraveling. I put the presser foot at the edge of the fabric and sewed around the whole flag. I decided not to fold the fabric under and then sew because I thought it would look cool to have some of the canvas fray. Now, I was ready to paint! Oh, how I love to paint. I am not very good at it thought so straight lines were right up my alley! I used my painter's tape so my stripes would be straight. After all, these flags are used in the Navy and they needed to be ship-shape!! Aye-aye, Captain! (Side Note: we have a painting of a sea captain that Troy acquired from an old roommate. He has become part of the family despite the fact that no one in their right mind would willingly use him as a serious piece of decor - except us. I even put a Santa hat on him at Christmastime. Zachary LOVES him. We walk by him multiple times a day and I say "Aye-aye, Captian!" and Z smiles super big. It's awesome.) Anyway, back to the project at hand....

Ladies and Gentleman, I give you the letter 'C.'
After I finished all the painting, I held my breath and pulled the tape off. To my surprise, the flags looked great!! There were a few spots where the paint had bled through a loose part of the tape, but I just took a very small paintbrush and fixed it with whatever color it should have been. My last step was to fold the top part over and then sew it down. I realized that I didn't want to sew across the flag because I didn't want to be able to see the stitch line across the top of the flag, so instead I sewed down vertically a few stitches on each side of the flag. Then using cable cord, I strung the flags and tied a knot between each flag. Then I stepped back and admired my work. I thought it looked great! Even better than the one I would have bought for over $100. The hubs helped me hang it in Zachary's room and it looks great!
It was the perfect final touch to our little man's room.
Z-A-C-H-A-R-Y
Umm, this still spells Z-A-C-H-A-R-Y, just a more artsy-fartsy view.
Z loves the flags too! Oh, that face. I just love it.
This was one of my favorite projects. I loved working on each step. Dare I say, I enjoyed it even more than the gold painted macaroni ornament circa 1989. I have already been commissioned to make a nautical banner, which I am excited about! If you are interested in having me make you one, let me know. I realize this seems a little shady, pimping my crafting out, but hey, a girl's gotta eat. 


Pam 2, Fabric Lady 0 . . . . . . . . Bam!


Friday, March 21, 2014

In Your Face Fabric Lady! (Part I - Pennant Bunting)

Welcome back! Thanks for showing up to watch me cream that Fabric Lady from Jo-Ann Fabric with my awesome crafting skills. In case you just tuned in, I mentioned in my last post, Fabric, Glue and Macaroni, that the woman who cuts fabric at a JoAnn Fabric told me that she never (nor knows of anyone who does) tries any of the pins that she finds on Pinterest. So, I am devoting a series of blog posts to show you all that I don't just go and buy materials for crafts and then never follow through like Fabric Lady, which is what she shall be called henceforth because Lame-and-Lazy-Not-Creative-Unwilling-to-Use-All-the-Resources-that-are-at-her-Fingertips-at-Jo-Ann Fabric Lady just seemed a bit too superfluous.

Anywho, Zachary's first birthday is the end of May and I have decided to do a nautical theme which I thought would complement the nautical baby shower my mom and sisters threw for me when I had the bun in the oven. I wanted to make some decorations for the party that could be used again either in Zachary's room, which is also decorated in nautical decor, or as a part of seasonal decorations for the house. I thought I would start with a really sweet fabric pennant bunting project. While at Jo-Ann Fabric, I chose three different fabrics that I thought would look cute together, then I brought them to the Fabric Lady to cut while she openly challenged me to a craft-off (that last part might have only been in my head).

When I got home, I made a template out of cardboard to be the size that I wanted my pennants (which is really just a fancy word for 'triangle') to be for this project. (Side Note: Don't throw away cereal boxes when you are finished with the yummy goodness inside. Cereal boxes make great templates because the cardboard is thick enough to use as a guide but not too thick to cut. Plus Mother Earth will thank you for reusing a resource.) I always flirt with the idea of not doing this next step because I hate it, but I ironed my fabric so the wrinkles from the bolt of fabric wouldn't hinder the cut. I always tell myself to not be so lazy and just iron the darn material, but something about it is just too hard. Next, I used a rotary cutter because it was faster, but if you are following along at home and don't have one, go old school and use scissors. I would like to take the time to mention though, that I have gotten oh so much use out of my rotary cutter and if you are on the fence about getting one, allow me to push you off in the direction of YES!

I love my rotary cutter!
Now, here is where I am going to be brutally honest with you even though it makes me look a little like a boob. I had planned on sewing a straight line all around the edges of the pennants to keep them from fraying; however, I was having a heck of a time making the stitch look nice. It seemed to pull the fabric funny, no matter how much I adjusted the tension on the sewing machine or on the bobbin. Then being the perfectionist I am, if the stitch wasn't absolutely straight, it drove me crazy. Enough was enough; I got out my trusty seam ripper and decided against the stitches. I think the problem was that I only had a one-sided pennant, so I was only sewing through one piece of fabric - I could be totally wrong about that. I would like to take this opportunity to give a shout out to the seam ripper. Seam Rippers are the best tool for sewing. My mom gave me some advice that I always think about when I sew. One time I was whining to her about not being able to sew something and she told me as long as I had a seam ripper, I could do it. Meaning, you're going to make mistakes - and that is totally okay! Just rip out the seam and start again. (Cue the Full House, "we have fixed all of life's problems" music.)

Going rogue was freeing and I thought that if the fabric did fray, it would look cool, so I decided to jump right to the fun part, pinking. If you haven't heard of pinking shears, they are scissors that leave a zig-zag pattern instead of a straight edge and they are super fun. I had debated buying these fabulous shears because they were in the twenty five dollar range at Jo-Ann Fabric, but then I found a great pair at Michaels for about twelve bucks! Win! I carefully "pinked" around the two longest sides of each of the pennants I cut, leaving the top "un-pinked". That part will get hidden but if you are having a blast with your pinking shears and want to keep going, then don't let me stop you! 

All pinked and ready to go!


Next, I bought double fold bias tape which you can find near the zippers, thread and ric-rac at your fabric store. This kind of bias tape made the next part super easy because there was no folding, ironing or subsequent migraines and/or temper tantrums involved. I slid the top part of the pennant between the folds of the bias tape and then folded the top part of the bias tape down. I pinned each side of the pennant so it would stay snug inside the bias tape. When I went to insert the next pennant into the fold of the bias tape, I made sure that the corners of each pennant where just barely touching. That way, I knew that I would have a uniform look when the bunting was complete. Remember the perfectionist I mentioned earlier? She would hate to look at pennants that were not equidistant.

I even took a picture of the bias tape for you. You're welcome!


All the pennants are pinned and ready to be sewn.

After I pinned all the pennants to the bias tape, I was ready to sew. This was really easy. All I did was sew a straight line. Anyone can do that. Even if you have never used a sewing machine before, you can do it and if you think you can't - just keep your seam ripper in view. I put the presser foot on the edge of the bias tape, closest to the pennants because I wanted to make sure that the thread would be going through all the material. When I finished, I measured the extra bias tape on each end and cut it so the length would be the same on both sides. I sewed down the raw edge so there would be a loop on each end since I am not sure yet how I want to hang this.

The presser foot is right on the edge of the bias tape.

Sewing up the loops on the end.


 After that, I was shocked to realize that I was finished with my project. I was finished before I knew it! I thought the best way to celebrate would be to hang up my work of art, take a few photos of it and revel in my greatness since I won the first of many craft battles against Fabric Lady.

Ta-Da!!

Super cute and super easy!


Pam 1, Fabric Lady 0 . . . . . . . . . . . . Boo-yah!

Monday, March 17, 2014

Fabric, Glue and Macaroni

When I was in kindergarten, I made the most fabulous craft. It is probably my favorite work of art, which is really a shame and somewhat sad that I am openly admitting that I "craft-peaked" at the age of five but this piece was really the cat's meow. It has all the characteristics needed to make a glorious craft; pasta, metallic paint, Christmas-themed, picture of a sweaty kindergartener (our school didn't have air conditioning so when we took our school pictures in the fall, everybody's hair had a matted down, wet look thanks to the perspiration.)

The craft was to make an ornament to give to our families for Christmas. (Schools weren't politically correct way back in the late 80's, so we openly celebrated Christmas in school. Gasp!) We were given a wooden, circular disc and we glued various kinds of macaroni all around the edges. Then our teacher spray painted the whole thing with GOLD paint (I know!) and finally, we glued the school picture of our sweaty selves in the middle. It was/is fabulous. 

Fast forward to twenty-(cough-cough!)-some years later and I am still that little kindergartener who loves macaroni and paint projects. This is one reason why I waste spend so much time on Pinterest. I have found some great little gems and had many successes with crafts, recipes and ideas.

Rewind to the beginning of February. My whole family went to visit my sister and her hubs in the Mitten, A.K.A. Michigan. The girls wanted to do a little shopping, so my sister took us to her local Jo-Ann Fabric and I decided to get a bunch of fabric to use for different projects that I have been thinking about making. Plus, my husband was in charge of watching the wee babe which meant I had the rare privilege of using TWO hands AT THE SAME TIME! Needless to say, I went hog wild. At one point, I think I had ten bolts of fabric in my cart. (I widdled it down to six bolts when all was said and done.) I went to the fabric cutting station and rattled off the measurements for each bolt of fabric. The lady at the counter was making small talk with me as she cut my material and asked what I was planning to make. I told her there was a few things I saw on Pinterest that I gave me some ideas for my creations. Then she told me that she NEVER makes anything she pins on Pinterest. After I picked my jaw up off the floor, I asked her if that was true. She said she always pins stuff but never does it and she didn't know many people who did.

Now....I know a lot of people who are not, shall we say, go-getters. But for the love of gold spray painted macaroni - she works in a Jo-Ann Fabrics!!! A mecca for crafters!! She has a surplus of hot glue sticks, beads, and ric-rac at her fingertips and she never tries anything she pins on Pinterest?! Blasphemous! Well, I was so upset, that I left Jo-Ann Fabrics.....

....right after I purchased all my goodies. 

These past few weeks as I worked on my crafts, I kept thinking about that Jo-Ann Fabric lady. I decided that I should probably blog about this, since this is my electronic diary. Therefore I am going to devote the next few posts to my super awesome crafts that I have made and I am going to entitle the posts "In Your Face Fabric Lady!" in case you want to check back in and see how I showed her. And, oh, how I will show her!

Until then, I will leave with this little gem. That's right, it's my ornament I made as a wee kinder. I thought that you too would like to revel in its awesomeness. You're welcome.


Monday, December 30, 2013

Mall Elves

Christmas can make you do funny things when you're a parent. No other time during the year will people drive to the mall, put their beloved children on a stranger's lap and take a picture of their kiddos with a man who hasn't shaved since 1975 and wears his red, fuzzy pajamas all day.  Parents love to see the reactions of their kids when they meet Santa and Troy and I were no exception. We knew we had to document Zachary's first Christmas with a trip to see ole' St. Nick. We decided to wait until we went home to Chicago and take him to Orland Square Mall where we had gone as kids to see Santa. We dressed him up all cute, bundled him up against the cold and headed to the retail mecca of my hometown. We looked on the lower level  of the mall where Santa had always been in years past but we couldn't find him. Troy thought we should look upstairs and lo and behold, there he was in all his wonder. I was relieved because by this point, I am sweating up a storm since I was wearing my Ugg boots, my winter coat, I was holding a 6 month old who was as equally bundled up and then hoofing it all over the mall. I breathed a sigh of relief as I commented that the line was short. We would be able to get in and get out and then go grab some lunch. That's when I had my movie moment.

Remember in the movie The Christmas Story, when Ralphie and his brother go and visit Santa and the "little helpers" are anything but helpful? They grab kids by their arms, shove them on Santa and then heave them down the slide. Or how about in the movie Elf when Zoey Deschanel's character acts like Ben Stein in a green mini dress? Look, I understand that these mall jobs are not exactly what these people probably had in mind for their lives. I don't know of anyone who dreams of being a mall elf. I am sure they are just trying to pick up some odd jobs to pay for school or rent, but can't they be a little more cheerful? While this may not be their dream job, they are interacting with children who are excited to see Santa.


My movie moment was somewhat similar to what I have described although this mall Santa didn't push Zachary down a slide with his boot. After seeing the short line and mentioning to Troy my great relief while pitting out from heat exhaustion, Santa's little helper turned to me. With a pimply straight face and a monotone voice she said, "Actually this is the last family that Santa is going to see right now. In 15 minutes he is going to take an hour break to go feed his reindeer."

She actually said that to us.

I was so hot and hungry and Zachary's window of opportunity was quickly closing. If we waited an hour and 15 minutes for Santa to "feed his reindeer" we would have a meltdown on our hands, and Zachary would probably pitch a fit too. So, we opted to come back the following day, Christmas Eve.

After thinking about the mall elf, I figured there were two ways I could have approached this young woman. My first thought was to ask her to talk to me like an adult and just tell me that Santa was going to go out by the Sears entrance and have his ciggy break and hit of whiskey off his flask. The second option was suggested by our friend Tim, who said I should have played along and gotten really excited about the reindeer and asked if I could help feed them. Oh man, how I loved that idea. I wish I had the guts to do that. There is no way I could get through that without laughing, but if I could it would have been glorious.

As it turned out, we did get pictures with Santa. We thought Zachary would cry because he is going through an I-only-want-my-mommy-and-daddy phase, but he was so mesmerized by Kris Kringle's beard that it turned out great. He eventually smiled for the camera and Troy and I were suckered into buying the cheapest photo package they had - which we accidentally left at my parents house. Then 30 seconds after we got Zachary off Santa's lap, he spit up all down his outfit.

So, all in all, it would say it was a big success even with the grumpy mall elves.

Saturday, December 21, 2013

Call Me, Maybe

I was just a kid the first time I saw a cell phone. My dad got one of those Zack Morris brick phones and my sister and I got such a kick out of it. When we would go out with my dad, we would look for reasons to be able to call our mom or a friend just so we could use the phone. I don't know how he did it, but my dad was able to stick that brick phone in his back pocket and walk around like a boss. It was so cool. 

By the time I got my first cell phone, I was way behind my peers. When I graduated college in 2005, I was one of two seniors who did not have a cell phone. I begged my parents to let me get a phone. I can still see my dad's face as he would give me a half smile and tell me that I could have a phone whenever I wanted . . . as long as I paid for the phone myself. Well, you know what? I did. My first little Motorola flip phone was fabulous and I was proud to write the first check for my phone bill. I soon graduated to another flip phone, but this one was pink! I always felt so cool, pulling my little cell phone out my purse and texting my BF or my BFFs.

Then the day came when I put my childish ways behind me and became a grown up cell phone user. The day I got my Smartphone. Troy and I did a ton of research to try and decide which phone to get. First we had to figure out which team we wanted to be on: Team Apple or Team Android. This was a toughie and seemingly very controversial depending on who we talked to. The iPhones were so cool and trendy, but we decided that we weren't really Apple people. We have personal frustrations with the one button. So, we set our eyes on the new Droid Bionic that much to our frustration, kept pushing pack the release date. Finally, it was available in Verizon stores. Troy was super sneaky about getting one too. He took my flip phone (my last one was purple) out of my purse in the morning. I didn't even realize it until I got to work and worried about where it was. (I never lose things.) I came home and told him I couldn't find my phone and that was when he presented me with my brand new, Droid Bionic. The sky opened up and the angels sang and played their harps as he handed the new technology to me.


I couldn't believe all the things I could do with my Droid Bionic. The whole world was at my fingertips. There would be so many times when I would think about something while I was out and think about how I wanted to remember to look that up when I got home - and then I realized I could look it up any time I wanted!! I always had a GPS with me. (Which is good because I am directionally challenged.) I could Google to my heart's content. (Who doesn't love to learn?!) I could be instantly notified when someone would Facebook me. (Thanks for 'liking' my status!!) I remember thinking that I have the most advanced phone, of course it was only a matter of time before my phone became obsolete in it's technology, but for a very short amount of time, my phone was the king.

Fast forward two years to today. I still have that Droid Bionic but she has aged and isn't as wry as she used to be. The old girl gets tired and freezes mid-thought. Sometimes she has a hard time remembering how to write out and send text messages. There are many times during the week when she just gives up and shuts down. Poor girl. Unfortunately, I my first thought at her many malfunctions is not that she has been faithful these past two years; rather I wonder if it will damage my walls if I throw her across the room. I get so frustrated that I can't .... wait for it .... search the world wide web, text or Facebook. (GASP!) Whatever did the pioneers do?! (Hashtag, First world problems; yep I just wrote out the word 'hashtag.') Last night the old girl freaked on me again and so I decided to take a break from her.

Like most people today, I may have become too dependent on technology. I am after all, writing a blog on a laptop, I'm not chiseling all this out of stone, but I do like to take the occasional break from technology. After watching Live with Kelly and Michael in the morning (I just love them!), the TV stays off until the evening. When my phone chimes to tell me that I have a message, I am probably one of the few people that doesn't freak out and rush to see what's going on. (I think this sometimes drives Troy crazy because then curiosity takes over and he needs to see what my phone wants me to know.) While it is unreasonable to say that we should remove all technology, maybe my old Droid is teaching me a valuable lesson, chill it out. So, I will head to the old girl's advice....until I upgrade, then all bets are off.

Tuesday, December 17, 2013

Lay Off, I'm Starving!

I am no Victoria Secret model, but if you were to look at me, I don't think your first thought would be, "That chick likes her food." However, if you were to say that, you would be right. I have always been a big fan of eating. I've never really been a picky eater (though I do have some texture issues - that's for another blog.) My mom tells me that when my sister and I were younger, if we were misbehaving, all she would have to do was threaten to send us to bed without any dinner. We (and by that I mean, mostly me) would dramatically beg for her to reconsider! Go to bed without dinner?! How cruel!! She never did do that, probably because her trick worked and we straighten up our act. 

As I have gotten older and more aware of what I consume, I am conscience of my eating habits. And since having Zachary I have had a few realizations on these eating habits, and friends, they are not pretty.

1. Drop the fry and nobody gets hurt. I like to share. In my mind, if you share then you really get twice the fun. I liked sharing my toys when I was a kid because then my sister Laura and I had twice the playthings. I like sharing meals with Troy because then we get twice as many foods to taste. I liked sharing clothes with roommates because my wardrobe was twice as big. There is one thing I have a really hard time sharing....french fries. French fries are one of my favorite foods. I know they are terrible for you, but I don't care. I love them. The worst is when you go out to eat with someone and you sit down and look at your glorious spread of golden fried potatoes and your meal-mate says, "I didn't order any fries because I thought I could have some of yours." In my head, I hear the buzzer from a basketball game and think about how I can politely tell that person to get his/her grubby hands away from my pile of fried goodness. I usually can't think of a good way to say it, so I turn into a prison inmate, hunched over my meal, consuming the best part (the fries) first. I'm not proud of this, but it's true. Look, if you want to preserve the meal and our relationship, order your own fries.

2. Get it while it's hot! I used to eat like a lady. I would cut my food in small bits, using the right utensils and sitting up straight. My main focus of meal time was to be graceful and enjoy the food. Now my main focus is getting something in my belly. Eating hot meals, while being the mama of a baby don't happen often. I am convinced that babies know when you are comfortable, hungry or have to go to the bathroom and that is the time they pitch a fit. So, when I can squeeze these things in, I do so and I do it in a hurry. I realized after having Zachary, I scarf down food like I am in a zombie apocalypse. We hosted Troy's family for Thanksgiving and we went out to dinner the Friday after. Zachary was doing great - until the food came. Troy's sister, Tricia snuggled with him so I could eat, but he was still crabby. I tried to eat quickly so that I could take him. I didn't notice how fast I was eating until I made eye contact with my mother-in-law who looked at me with big eyes and told me to slow down. I think she had started prepping herself to perform the Heimlich Maneuver on me. I realized I must look like I was challenging myself to a game of Chubby Bunny. (For those of you who don't know the game Chubby Bunny, you have to keep putting large marshmallows in your mouth and still be able to say the words "chubby bunny." If any marshmallows come out, you can't say the phrase, or you puke, you lose. Sweet game, huh?) Even when I am not with Zachary, and I am eating, I realize I eat like I am in a hot dog competition. I have to remind myself to slow down. So, if we go out to eat, I am truly sorry that you have to watch me. I am hoping that some day, graceful Pam comes back. Until then, I should probably not go out in public.

3. Vacancies Available. During the last few months of my pregnancy, I was hungry all the time because I could only eat small meals. My stomach was all squished thanks to Baby Carlson so not much could fit in there at once. Since Zachary's birth, because I am nursing, I am hungry 24/7 and normal sized meals feel like a snack. I think since he was born (on May 30), I have only felt full maybe three or four times. I feel like Mrs. Pac Man, but there are never enough dots to eat. What's a girl gotta do to get a bunch of bananas whilst running from the colored ghosts?! I have been drinking a lot of water and chewing a lot of gum to fool my stomach, but I don't think it's working. You know what would work? A large fry. Mmmm fries.


I could write another clever paragraph to wrap things up but I think this video would be the best closure for this post. I really don't need to write another word.